when my 2 bridesmaids who are friends from college offered to throw my
traditional shower, i was thrilled not only with their desire to host something but also because they are both very creative & crafty gals. they will be hosting with my sis in law, who is also an extremely crafty lady, i can't wait to see what they have planned, what i do know it will be a fabulous shower! Being that my college friends are recent grads, budgets are tight, with that in mind i offered my gocco services to them to help keep the costs down on the shower invites. they have been so cute in wanting to make sure that i will love everything they have planned, even though i've told them i trust their judgement 100%!
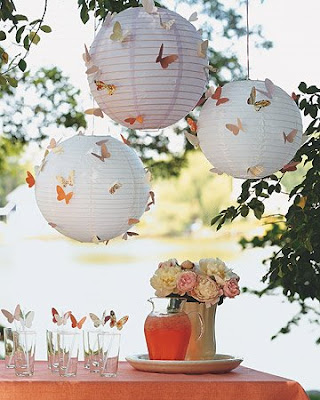
above is the inspiration for the shower's theme, stolen of course from good old Martha!
you can find the butterfly template
here
two weekends ago 3 of us met at one of their houses in LA to crank out the invites.. here's how they turned out:
above is a batch of invites, the girls came up with the idea to use a hole punch in the butterflies to run ribbon through. in this picture you can also actually see the shine that the gocco inks produce when printed, so pretty!

the above invite gives you an idea of how detailed the gocco can print, however i blurred areas with top secret info for privacy reasons!
a little note to fellow gocco'ers
also, we did have a snafu with the gocco printing the text... i hate to admit my little gocco was not a friend at the beginning of this project! it was my foe until i realized i wasn't considering the margins of the screen when i burned my master! if you've gocco'd you know it's great when you can use 1 screen to do a print job... well i wasn't keeping the invite within the 3.5 x 5 inch margin, it was too wide. so i wasted a few screens trying to trouble shoot this, and each time the RSVP and the rsvp email address we not printing the ink and i got really frustrated!
just when i was about to throw in the towel, i found a post in my yahoo gocco group that the screen can only handle 3.5 inches wide... after that it was smooth sailing!
hope this helps some of you future gocco'ers, because i know it's no fun to waste supplies
tangent over, back to my invites
we turned to martha again for her handy dandy wrap around address labels.

below is what the return address looks like, and yes USPS is fine with the return address being on the back of the envelope!

to create the labels i actually took Martha's idea and created my own in the Mac program "Pages". i did this myself only because we were working with a smaller scale envelope.
step by step here's how i made the labels myself:
- opened the Pages program on my computer
- insert the rectangle shape
- open the "inspector" and click the "graphic" section and change the stroke option to whichever dotted line you like best
- next i opened a text box and picked the font "Snell Roundhand"
in all lowercase type the return address portion
- then i typed the addressee's name in "Snell Roundhand bold"
closer to the right end of the label
- for the address i used "imperator caps" and make sure the zip code is on it's own line with a space between each number.
like this: 9 2 8 4 0 as opposed to 92840...
see how it gives the zip a different look, besides Martha advises it! =)
- once you've made all your labels, print those out on the preferred color paper
- cut those out and then send them through your Xyron machine
- while still attached to the wax backing use a bone folder or straight edge to make the crease where it will wrap around the envelope
- lastly pull the label off the backing and stick it on each envelope!
and you're ready to send them to their new homes


