wedding style, the current joy of my life... follow along with me as i plan our aug 08 wedding

Showing posts with label gocco. Show all posts

past weekend's gocco fun!

May 15, 2008

our rehearsal dinner invites 
(sorry for the blurs, gotta protect our privacy)
i say fun, because this gocco print job was pretty smooth sailing!
oh that's a lie actually, i did gocco all of the project just to show them to my FI and him tell me the RSVP phone# was wrong!... arg....
so back to Paper Source i went, picked up 2 packs of new B6 cards and spend my saturday
trying again! =) i was helping out FMIL by gocco'ing our rehearsal dinner invites, which
by the way turned out awesome (this is the smooth sailing part)

here's a picture filled step by step of the process:
putting my screen to good use by running other colors for upcoming bridal expo merchandise. 
gocco screens don't really preserve well, so if you aren't doing a large quantity run, you aren't getting a good return on your $3 screen!


gocco'ing also happens to take up A LOT of space, ie the dining room table, a coffee table, and our antique desk (pictured here).  if you'd like to avoid this.... buy lots of card drying racks, and i thought 3 would be plenty  ha ha!

this is as i was about to begin my second run on the invites for the text - you have to let it dry if you have to do multiple passes ( more than one screen)


the coordinating envelopes... just tying it all together


i love these even without the invite text - you'll be able to find these in my etsy store soon!


i laid out my laser printed master, and burned my screen - here you can see the ink blocking foam, and how i separated colors, this is the brown ink only.  i block really close to the text to trap the ink, and also so i don't waste ink by letting it run all around the screen.


here we have the brown and gold inks, almost ready to print!


peeling back the master copy 
hint: if you leave the mast stuck to the screen until after you apply the ink, you don't have to worry about the ink getting on things or smearing prior to starting.


close up to give you idea of the detail of the gocco print quality - if you look closely at the R in dinner, you'll see that i wasn't keeping a close eye on the ink, some areas of the screen do tend to burn through ink very quick, so pay attention to each print, you do have to re-ink some areas even on short print runs!

i believe this is misty's first appearance on the blog... but she was lending blogging moral support while i sat here and typed.

anyone else gocco'ing everything in sight???

next gocco projects on my list:
invites
cocktail napkins
programs
menus TBD
gifts for some special someones =)


second set of shower invites

May 7, 2008

when my 2 bridesmaids who are friends from college offered to throw my 
traditional shower, i was thrilled not only with their desire to host something but also because they are both very creative & crafty gals.  they will be hosting with my sis in law, who is also an extremely crafty lady, i can't wait to see what they have planned, what i do know it will be a fabulous shower!  Being that my college friends are recent grads, budgets are tight, with that in mind i offered my gocco services to them to help keep the costs down on the shower invites.  they have been so cute in wanting to make sure that i will love everything they have planned, even though i've told them i trust their judgement 100%!  
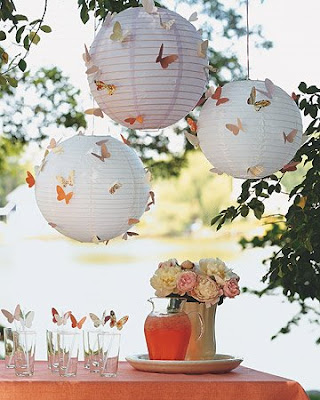
above is the inspiration for the shower's theme, stolen of course from good old Martha!
you can find the butterfly template here

two weekends ago 3 of us met at one of their houses in LA to crank out the invites.. here's how they turned out:

above is a batch of invites, the girls came up with the idea to use a hole punch in the butterflies to run ribbon through. in this picture you can also actually see the shine that the gocco inks produce when printed, so pretty!

the above invite gives you an idea of how detailed the gocco can print, however i blurred  areas with top secret info for privacy reasons!

a little note to fellow gocco'ers
also, we did have a snafu with the gocco printing the text... i hate to admit my little gocco was not a friend at the beginning of this project! it was my foe until i realized i wasn't considering the margins of the screen when i burned my master! if you've gocco'd you know it's great when you can use 1 screen to do a print job... well i wasn't keeping the invite within the 3.5 x 5 inch margin, it was too wide.  so i wasted a few screens trying to trouble shoot this, and each time the RSVP and the rsvp email address we not printing the ink and i got really frustrated!
just when i was about to throw in the towel, i found a post in my yahoo gocco group that the screen can only handle 3.5 inches wide... after that it was smooth sailing!
hope this helps some of you future gocco'ers, because i know it's no fun to waste supplies
tangent over, back to my invites

we turned to martha again for her handy dandy wrap around address labels. 
below is what the return address looks like, and yes USPS is fine with the return address being on the back of the envelope!
to create the labels i actually took Martha's idea and created my own in the Mac program "Pages".  i did this myself only because we were working with a smaller scale envelope.

step by step here's how i made the labels myself:
- opened the Pages program on my computer

- insert the rectangle shape 

- open the "inspector" and click the "graphic" section and change the stroke option to whichever dotted line you like best

- next i opened a text box and picked the font "Snell Roundhand" 
in all lowercase type the return address portion

- then i typed the addressee's name in "Snell Roundhand bold" 
closer to the right end of the label

- for the address i used "imperator caps" and make sure the zip code is on it's own line with a space between each number.  
like this:  9 2 8 4 0 as opposed to 92840... 
see how it gives the zip a different look, besides Martha advises it! =)

- once you've made all your labels, print those out on the preferred color paper

- cut those out and then send them through your Xyron machine

- while still attached to the wax backing use a bone folder or straight edge to make the crease where it will wrap around the envelope

- lastly pull the label off the backing and stick it on each envelope!

and you're ready to send them to their new homes

gocco printing 1st edition

Apr 10, 2008

alright so here's my step by step process for my 1st gocco project!
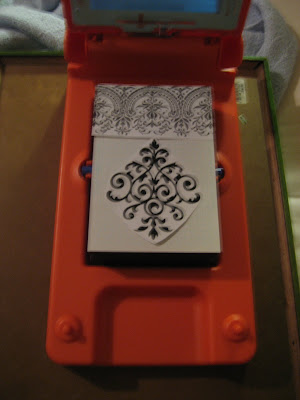
in order to make your image burn onto the screen 
you need carbon in your print out it's the key ingredient 
  • this means if you create your image/ pattern on the computer you either need to use a laser printer (has carbon) or print off from your ink jet (which i have) and run to office depot or kinkos and run off a xerox copy (which has carbon).
  • when i got back with my xerox copies i cut the images out and lined them up with the grid of the gocco drawing papers, to ensure that my images where square.

    here are 3 pre-master screen layouts, i crammed a lot on each screen (i figure why waste a screen on 1 graphic, why not fill it all up?) the dark image all the way to the right is the one i plan on using for the rehearsal dinner invites.
here's the layering order
  • next you place the images you want to burn onto the pad w/ grid
  • then you slide the blue screen in next to the plexi glass window 
  • between the blue screen and the image you want to burn - you slide in the mesh screen with it's blue side facing you & red arrow pointing down. 
  • next you put what i'll call the flash bulb house in the top 
  • push down and you'll see a bright flash 
  • for good measure, i dunno if it helps/matters of not, but i hold the lid down for a few seconds. to me it seems like the extra heat time might help further the image transfer! i might be crazy though... =)
  • then go ahead and take off the flash bulb house and throw away the bulbs (remember they're toxic)
  • take the screen out along with the blue screen ( you're done using it now you can put it away) and pull back the plastic flap of the mesh screen and foam block around the image you want to use
  • apply your desired ink inside the foam block - the dark areas are where the ink will push through the screen
  • put the screen back in the gocco unit the same with blue side facing out and red arrow pointing down.
  • put your paper on the foam printing pad and stamp away!
here i was printing the envelope flaps and it got a little messy, remember if you don't have a paper covering the whole area that is currently inked it will make a mess kinda like you see above! oops
i was gocco'ing outside enjoying the sunny day!


i used the design template from the Weddingbee guest blogger
and then used my gold ink, which my camera did not do the ink any JUSTICE!
it has a beautiful shimmer to the ink which you can't see in the pic. the card stock is from paper source size A6 in Pool

i guess this is the start of my gocco obsession!
if anyone has gocco questions feel free to ask, i've become a quasi expert while i was procrastinating on using my unit!


Drum roll please...............Gocco Part 1

Apr 8, 2008


i did it... i finally tested out my print gocco!

last night i overcame my fear of messing up the gocco screens or wasting bulbs.

let me pause here for a momentary flashback about my interest in the gocco....

while following along with the Weddingbee blog, i kept trying to figure out what this commonly posted "gocco thing" was... and finally one day i stumbled upon this 
how to etsy tutorial and it helped my understanding!

not only did i understand, i started looking for pics of what this little contraption could do....
i found these beautiful invitations:


so here's what i recieved in the mail from leslie of alittlegoodness etsy shop
1 gocco printing unit
a 4 pack of flash bulbs
drying rack
came with red, gold, & black ink
2 high mesh screens
carbon pen for freehand designs
ink blocker (keeps ink from going where it's not supposed to go)
i ordered some extras:
a free hand drawing pad
6 extra colored inks
some extra bulbs (should've gotten extra screens too)

here's a pic of my first screen - it's different styles of 
"thank you" 
&
"merci beaucoup"
i figured i'd fill up the screen, there's no sense in wasting a whole screen on 1 thank you!


after the thank you screens, i burned the details screen with 2 brocade patterns 


now stay tuned to see how the screens actually print on paper... i'm getting nervous again!
i may take me a day or 2 to get over the fear of imperfection on my 1st print job!


i think i'm in love

Mar 21, 2008


with the print gocco!!!!


in case you haven't heard of this fabulous little contraption, oh boy!... it is quite something and will be the solution to my wedding invitation crisis.  awhile back i fell hard for the idea of navy invites with white lettering... 
then my hopes were dashed when i was repeatedly told by stationers that i would have to cough up a few pretty pennies to letterpress my invites in order to achieve this look...argg!
that was quite disappointing seeing how i am very frugal, and would rather put that money into something more substantial, like say... my dress or photography! 

then ... along came this crazy thing i kept seeing pop up all over the Weddingbee blog, which i've become a loyal daily reader =). so i couldn't stand it any longer, the other day i started reading up on the print gocco and.... Voila, i got it! it's a personal screen printer, the only method my brother told me would successfully create the white lettering on the dark paper! HA i can make my invites and from the comfort of my own home. SOOO exciting!
ta-da.. i give you my soon to be personal print gocco, it is ordered and almost signed, sealed, and delivered!  i will post as soon as i have it in my hot little hands to fill y'all in on my new gadget!