wedding style, the current joy of my life... follow along with me as i plan our aug 08 wedding

Showing posts with label invitations. Show all posts

{recap} wedding invite - final product

May 3, 2009

let me preface this post by saying - a majority of the photos were taken by me... and i'm terrible at detail shots - so i apologize for the blurry, out of focus ones! =)

ok so here's the final product - this pic was actually shot by a friend at one of my bridal showers - thanks shayn - keep up the good work!

back to my photos again - here's the belly band my sis-in-law slaved away on - 2" by 12" creates this look - then i layered the 1"x 1" blue square (which has the gold gocco'd sand dollar) on top of the ivory 2"x 2" square to "close" the band off.

once you slide the belly band off - it reveals the inside of our pockets - lined with my favorite paisley paper - the invitation piece sits on the left (with gocco'd gold sand dollars again) - and all of the info cards and rsvp postcard are in the pocket to the right (again lined with my favorite paisley paper).

here's a shot of the ceremony & reception card... duh =)

direction card - again tying in our sand dollar motif 

here's the front of our rsvp postcard


and the back - it was really fun to get responses and song requests back from our guests!


finally after all the hard work, they're ready to be shipped out to all our wedding guests! i really loved the Louis Comfort Tiffany stamps we used - they worked well with our overall color scheme!

and here our invitations are immortalized by our wonderful photographer -

hope you enjoyed seeing some of what went into DIY'ing your own invitation suite, it's A LOT of hard work - but if you have help from family and friends you too can DIY your dream invitations! 

next up - i'll be deconstructing my inspiration board - showing you my inspiration photo and the real life wedding photo, it should be fun!

b

{recap} wedding invite workshop

Feb 19, 2009

well... to start off the wedding recaps, i think i should begin with our invites - since they did inspire a great deal of the details that stood out on our wedding day.

after designing and printing the invites - which were partially printed by a family friend, then the sandollar details were gocco'd by me - we had a family assembly party consisting of my parents, my brother and sis-in-law, myself and my hubby (then fiance). each person more of less to charge of a "station" ...

here's what we had to tackle that day:
-emboss address on all envelope flaps
-crease and close belly bands
-xyron paisley pocket liners & all invitation pieces
-adhesive main paisley liner and flap liner
-gocco all sandollar details
-adhesive invites into pocket folders
-insert all the detail cards into pockets
-apply postage stamps to rsvp postcards
... that was pretty much it! sounds easy right? well take a look at the process and you decide, but in my opinion this was a labor of love that took upwards of 10 hours to complete!

here are my bro and sis-in-law: he's embossing our envelope flaps 

and here lisa is using the sample belly band that's taped to the mat to line up the crease marks for each band

even my now hubs got involved - J worked the xyron machine to make the pocket folder lining into stickers, making them easier/quicker to stick the lining on. and that's me standing gocco'ing the sandollars!
mom and J watching me work the kinks outta lining the pocket folders


in the pic below - my nephew showing off something and if you look at my gocco screen you can see the various sizes of sandollars awaiting their turn to be gocco'd

mr. b .... in the zone - our family is full of perfectionist, especially him, so those embossed envelopes were perfectly squared thanks to the mat, some blue tape, and repeat - repeat - repeat
here you can see the grid my bro set up to use to emboss all the envelopes and in the next pic my mom testing it out

two perfectionist - my dad and bro - go figure, racing to see how many they could line in 10 minutes! boys operate so differently from women

taking a break to play a lil' wii bowling...

no longer is it light outside and the girls of course are still working on affixing the lining and the actual invite pieces to the pocketfolders 

later that night i continued lining pocket folders and backing the invites to the liner...

first i put in the part that sits behind the invite, then the flap had to be attached

i made sure to run my bone folder over all the liner to smooth it down and make sure there were no ripples

last up was to stick on each invitation piece which had previously been xxyron'd to create a stick backing so i could easily stick them all in to their own pocket folders.
next up i'll show you the final results of all the pieces assembled and ready to be sent out to our guests!

it's so hard to believe we were making these almost a year ago in May! wow!


past weekend's gocco fun!

May 15, 2008

our rehearsal dinner invites 
(sorry for the blurs, gotta protect our privacy)
i say fun, because this gocco print job was pretty smooth sailing!
oh that's a lie actually, i did gocco all of the project just to show them to my FI and him tell me the RSVP phone# was wrong!... arg....
so back to Paper Source i went, picked up 2 packs of new B6 cards and spend my saturday
trying again! =) i was helping out FMIL by gocco'ing our rehearsal dinner invites, which
by the way turned out awesome (this is the smooth sailing part)

here's a picture filled step by step of the process:
putting my screen to good use by running other colors for upcoming bridal expo merchandise. 
gocco screens don't really preserve well, so if you aren't doing a large quantity run, you aren't getting a good return on your $3 screen!


gocco'ing also happens to take up A LOT of space, ie the dining room table, a coffee table, and our antique desk (pictured here).  if you'd like to avoid this.... buy lots of card drying racks, and i thought 3 would be plenty  ha ha!

this is as i was about to begin my second run on the invites for the text - you have to let it dry if you have to do multiple passes ( more than one screen)


the coordinating envelopes... just tying it all together


i love these even without the invite text - you'll be able to find these in my etsy store soon!


i laid out my laser printed master, and burned my screen - here you can see the ink blocking foam, and how i separated colors, this is the brown ink only.  i block really close to the text to trap the ink, and also so i don't waste ink by letting it run all around the screen.


here we have the brown and gold inks, almost ready to print!


peeling back the master copy 
hint: if you leave the mast stuck to the screen until after you apply the ink, you don't have to worry about the ink getting on things or smearing prior to starting.


close up to give you idea of the detail of the gocco print quality - if you look closely at the R in dinner, you'll see that i wasn't keeping a close eye on the ink, some areas of the screen do tend to burn through ink very quick, so pay attention to each print, you do have to re-ink some areas even on short print runs!

i believe this is misty's first appearance on the blog... but she was lending blogging moral support while i sat here and typed.

anyone else gocco'ing everything in sight???

next gocco projects on my list:
invites
cocktail napkins
programs
menus TBD
gifts for some special someones =)


invite sneak peek

May 13, 2008


all i can say is that our invite will not be black!
this is an illustrator proof of the way our invites will look... the black represents 
navy blue paper, and the white text will be where the natural white text will be.
also the dead space to the right of the top text area and the dead space to the left of the text space at the bottom, will showcase our wedding icon which will be a common theme throughout the wedding and decor.  
what is the icon?
it's nautical
it's a shell
but you'll just have to wait and see when i show the actual finished product!

did anyone else out there expect that the invites would be such a time consuming and extremely detailed project? because i sure didn't!


wilshire graphic press embosser

since my family is quite artistically inclined, we will be gathering this weekend to assemble 
my wedding invites.  something that i realized i had forgotten to order was our return address embosser.  i had done some research and knew basically what i wanted, but since my parent's home will no longer be my address come August, i wanted to make sure it is something my mom likes, since she will be inheriting the embosser after it serves it's purpose for the invite envelopes.

below is a representation of the type of embosser style we ordered.


the company we ordered from has been featured on weddingbee.com, and i've seen them in wedding mags, and have heard nothing but praise for their quick turnaround time.

wilshire graphic press won our wedding business for the reason they proved today!  i ordered the embosser online at about 1pm, when i returned home from work i found this email proof in my email inbox (it came in at 6pm)! 
sorry for the blurs... you know...

that's such a quick response with our proof, meaning i have already approved it, and it's on its way to their 3 - 5 day production..... since the proof was supposed to get emailed to me within 24 hrs, i can only imagine how quickly they will get the embosser made and shipped. i just know they've won my business in the future, once my FI and i have a permanent address to commit to return address labels and embossers!


and i'll be sure to do a large post once the invites are assembled and the workshop is complete sunday!

in the wedding planning process many vendors do not aim to please... have you been absolutely blown away by some vendor's fantastic customer service? and when it happens doesn't it just make your day and help you enjoy the planning process even more?

UPDATE:  the embosser arrived at my house on saturday, a day before out family invite assembly workshop!


second set of shower invites

May 7, 2008

when my 2 bridesmaids who are friends from college offered to throw my 
traditional shower, i was thrilled not only with their desire to host something but also because they are both very creative & crafty gals.  they will be hosting with my sis in law, who is also an extremely crafty lady, i can't wait to see what they have planned, what i do know it will be a fabulous shower!  Being that my college friends are recent grads, budgets are tight, with that in mind i offered my gocco services to them to help keep the costs down on the shower invites.  they have been so cute in wanting to make sure that i will love everything they have planned, even though i've told them i trust their judgement 100%!  
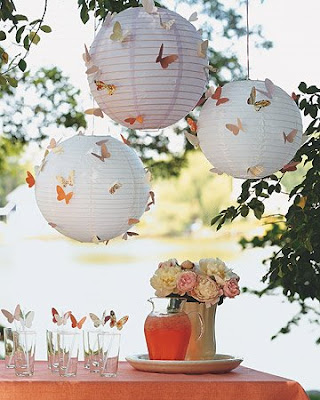
above is the inspiration for the shower's theme, stolen of course from good old Martha!
you can find the butterfly template here

two weekends ago 3 of us met at one of their houses in LA to crank out the invites.. here's how they turned out:

above is a batch of invites, the girls came up with the idea to use a hole punch in the butterflies to run ribbon through. in this picture you can also actually see the shine that the gocco inks produce when printed, so pretty!

the above invite gives you an idea of how detailed the gocco can print, however i blurred  areas with top secret info for privacy reasons!

a little note to fellow gocco'ers
also, we did have a snafu with the gocco printing the text... i hate to admit my little gocco was not a friend at the beginning of this project! it was my foe until i realized i wasn't considering the margins of the screen when i burned my master! if you've gocco'd you know it's great when you can use 1 screen to do a print job... well i wasn't keeping the invite within the 3.5 x 5 inch margin, it was too wide.  so i wasted a few screens trying to trouble shoot this, and each time the RSVP and the rsvp email address we not printing the ink and i got really frustrated!
just when i was about to throw in the towel, i found a post in my yahoo gocco group that the screen can only handle 3.5 inches wide... after that it was smooth sailing!
hope this helps some of you future gocco'ers, because i know it's no fun to waste supplies
tangent over, back to my invites

we turned to martha again for her handy dandy wrap around address labels. 
below is what the return address looks like, and yes USPS is fine with the return address being on the back of the envelope!
to create the labels i actually took Martha's idea and created my own in the Mac program "Pages".  i did this myself only because we were working with a smaller scale envelope.

step by step here's how i made the labels myself:
- opened the Pages program on my computer

- insert the rectangle shape 

- open the "inspector" and click the "graphic" section and change the stroke option to whichever dotted line you like best

- next i opened a text box and picked the font "Snell Roundhand" 
in all lowercase type the return address portion

- then i typed the addressee's name in "Snell Roundhand bold" 
closer to the right end of the label

- for the address i used "imperator caps" and make sure the zip code is on it's own line with a space between each number.  
like this:  9 2 8 4 0 as opposed to 92840... 
see how it gives the zip a different look, besides Martha advises it! =)

- once you've made all your labels, print those out on the preferred color paper

- cut those out and then send them through your Xyron machine

- while still attached to the wax backing use a bone folder or straight edge to make the crease where it will wrap around the envelope

- lastly pull the label off the backing and stick it on each envelope!

and you're ready to send them to their new homes

i think i'm in love

Mar 21, 2008


with the print gocco!!!!


in case you haven't heard of this fabulous little contraption, oh boy!... it is quite something and will be the solution to my wedding invitation crisis.  awhile back i fell hard for the idea of navy invites with white lettering... 
then my hopes were dashed when i was repeatedly told by stationers that i would have to cough up a few pretty pennies to letterpress my invites in order to achieve this look...argg!
that was quite disappointing seeing how i am very frugal, and would rather put that money into something more substantial, like say... my dress or photography! 

then ... along came this crazy thing i kept seeing pop up all over the Weddingbee blog, which i've become a loyal daily reader =). so i couldn't stand it any longer, the other day i started reading up on the print gocco and.... Voila, i got it! it's a personal screen printer, the only method my brother told me would successfully create the white lettering on the dark paper! HA i can make my invites and from the comfort of my own home. SOOO exciting!
ta-da.. i give you my soon to be personal print gocco, it is ordered and almost signed, sealed, and delivered!  i will post as soon as i have it in my hot little hands to fill y'all in on my new gadget!